.png)
Searching the subject of interest
Searching in the Finder
The Finder offers you many different possibilities to get information about your IT infrastructure. To help you find your way through, the Search box in the Start page is the best place to get started with the Finder. The Search box is a valuable tool for both beginners and experienced users and it can save you lots of time by directly bringing useful information to your fingertips. To look for a particular piece of information in the Finder, just type what you are looking for in the Search box.
To search in the Finder with the Search box:
Locate the Search Box at the top of the Start page, placed to the right of the Nexthink logo and labelled with the legend What are you looking for?. The Search box has a distinctive magnifying glass on its right side.
Type related terms to the subject of interest in the Search box (minimum three characters).
Press Enter or click the Search button.
Optional: Click the cross to cancel the current search and erase both the Search box and the list of results.
The results of a search are all items and investigations that are related in some way to the words that you typed in. For instance, you can look for users, devices or applications by typing in the first letters of their names. In this way, if you type nexthink in the Search box, you get a list with the applications from this company that are installed in your system, such as the Finder and the Collector, along with their executables and binaries, the packages that installed those applications, the devices where they were installed or even the visited web domains that are related to Nexthink, such as doc.nexthink.com. Similarly, you can look for investigations related to generic objects by typing the name of the object. For example, if you type in the keyword printers in the search box, you get investigations related to printers under the section Investigations. You can also search by platform. For example, type Mac OS applications to search for applications on the Mac OS platform.
Search results
As an example, let us examine the search results when looking for user gdaniel in the Finder:
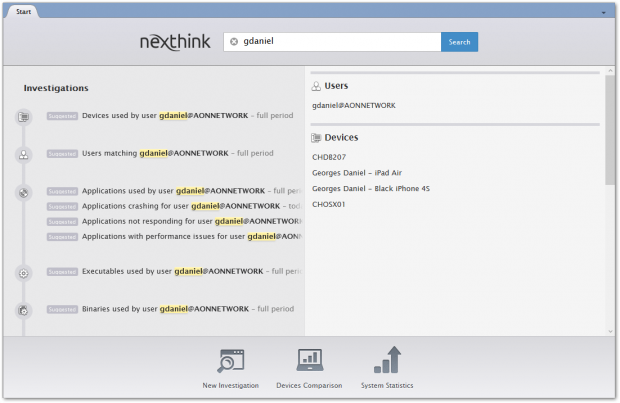
The results are divided into two sections:
The section Investigations on the left-hand side of the window.
The related items section on the right-hand side of the window, which includes the objects, services, metrics, categories, campaigns, scores, and remote actions that match the search terms.
The Investigations section usually shows both suggested and existing investigations:
Existing investigations are those that have been previously created in the Finder and are available to the current Finder user.
Suggested investigations are those inferred from the search terms and proposed by the Finder on the fly. All suggested investigations in the list are marked with the keyword Suggested.
In this specific example, only suggested investigations show up, as there are no existing investigations that include the term gdaniel. Each investigation is preceded by an icon that indicates the object on which the investigation is based. Click an investigation on the list to run it.
Result items on the right-hand side of the window are grouped by type. Click the result item to drill-down to it or right-click the item to trigger different actions.
Cross-Engine search results
When the Cross-Engine search features are fully enabled (including search and auto-complete), the Finder generates the suggested investigations on the left-hand side of the search window by matching the search terms with data retrieved from all Engines:
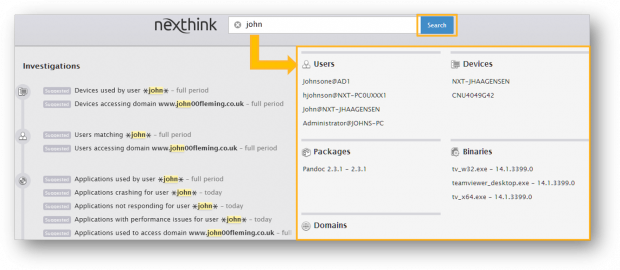
Items related to the search are also retrieved from all Engines and displayed on the right-hand side of the search window, regardless of the Cross-Engine features being fully or just partially enabled.
Retrieved users and devices are limited by your view domain. Click the name of a user or device to respectively open the user or device view, regardless of the Engine where the user or device is located.
The search results of objects other than users or devices are not limited by your view domain. However, if you drill-down from the search results to an object that is not in your view domain, you get an empty list with the following highlighted message at the top: Either there are no results or you do not have permission to view them.
Click here for more information on how to effectively search in the Finder.
Searching devices in the Portal
The Portal includes a search tool, called Device locator, that looks for devices across all connected Engines. To know which Engine receives information from a particular device, enter the name of the device or the name of a user of the device in the Device locator.
To look for a particular device in the Device locator:
Click the magnifying glass in the top right corner of the Portal. The Portal brings up the Device locator.
Type the name of the device or the name of a user that has interacted with the device in the search box labelled Enter a device or user name. Incomplete names are allowed.
Click Search or press Enter.
Results show up below up to a maximum of ten entries. If necessary, refine your search to reduce the number of matching results. Each entry displays the name of the device, the user that last logged in to the device, the Engine to which the device sends information, and the last time that the device has been seen in the network.
Optional: Click the name of the device in the list of results to open the device view of that device in the Finder.
Optional: Click the name of the last logged in user in the list of results to open the user view of that user in the Finder.
RELATED REFERENCE
RELATED CONCEPTS