.png)
Assigning Collectors to Engines
Overview
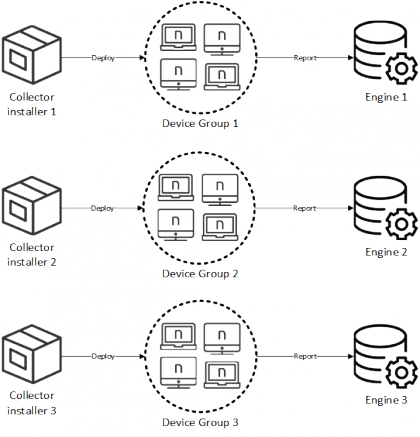
Every Collector must know the address of its assigned Engine to work properly. The address of the Engine was thus typically embedded in the installer of the Collector when generating the installer itself. Hence deploying the Collector on a setup with multiple Engines required to generate a different installer for every group of Collectors that were assigned to a same Engine.
Once installed, each Collector could be reassigned to any other Engine by means of the Collector Configuration tool or the Control Panel extension, when available.
With rule-based Collector assignment turned on, generate instead a single installer that provides the address of the Portal (and not of the different Engines) to all Collectors. Upon first connection, each Collector receives the address of its assigned Engine from the Portal. Thereafter the Collector can start sending end-user information to the Engine as usual:
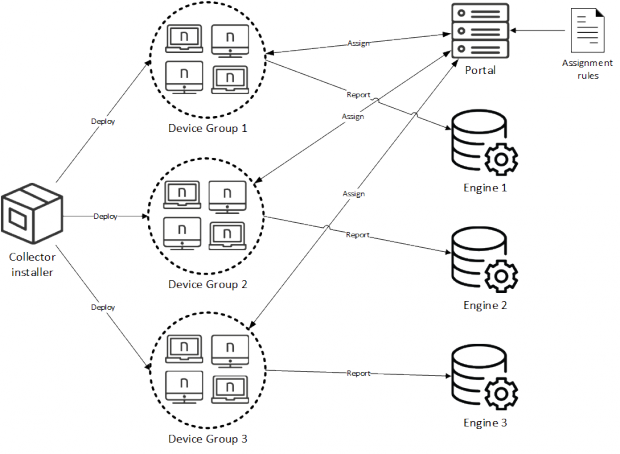
In subsequent connections to the Engine, each Collector checks whether it is assigned to the same or to another Engine and switches Engines accordingly. Hence, in a migration scenario, if a Collector is already connected to an Engine in legacy mode and you turn rule-based assignment on, you do not need to configure the Portal address for that Collector to receive its first assignment, as the Collector will directly receive the assignment from the Engine instead.
The Portal manages the assignment process thanks to a configurable set of rules. By modifying the set of rules, dynamically reassign Collectors to different Engines. The rules define the assignment of Collectors not only to Engines, but also to entities, which constitute the base to organize your devices in hierarchies. Therefore, note that activating rule-based Collector assignment overrides the conventional method to assign entities to devices.
In addition to the connectivity between Collectors and Portal, the process of assigning Collectors requires extra connections between the Portal and the Engines. Review the connectivity requirements for rule-based Collector assignment.
Regarding platform compatibility. Both Windows Collectors V6.19 and above and Mac Collectors V6.21 and above support rule-based assignment of Collectors.
The entity assignment specified by the same rules is valid for any version of both Windows and Mac Collectors, even if they do not have a working TCP connection.
Applies to platforms | Windows | macOS |
Support for rule-based Collector assignment
Starting from V6.20 and unless otherwise specified (see exceptions below), rule-based Collector assignment is the preferred method to assign devices to Engines in new installations. Please contact Nexthink Customer Success when upgrading a previous version of Nexthink with legacy assignment of Collectors.
The operations described in this article should only be performed by a Nexthink Engineer or a Nexthink Certified Partner.
If you need help or assistance, please contact your Nexthink Certified Partner.
Rule-based Collector assignment supports rules with conditions on the following device fields:
Last IP address
Last local IP address
Name
Distinguished name reported by Collector
AD site
Collector tag
Collector string tag
Ensure that you do not have any roaming devices that switch between Engines and whose assignment is based exclusively on the Last IP address of the device. Starting from V6.24, using the Last local IP address of the device instead solves the issue.
Incompatibilities
When Portal and Engine are installed on the same Appliance.
When the conditions depend on the IP address of the device, rule-based Collector assignment is incompatible with:
The local IP address beta feature, which is deprecated from V6.24 and superseded by the Last local IP address field.
The redirection of Collector traffic. If you are running the redirection service and you want to implement rule-based Collector assignment on your setup, contact Nexthink Customer Success Services to verify the compatibility of both techniques for your particular setup.
Managing certificates
Because Collectors can now communicate with the Portal through their TCP connection, if you installed a custom certificate to protect the TCP communication of the Collectors with the Engine, you need to upload the custom certificate to the Portal appliance again.
Writing the assignment rules
Express the rules for Collector assignment in a CSV file that has the tabular structure of the following example:
entity_rule | Engine | Entity | Field1 | Pattern1 | Field2 | Pattern2 |
|---|---|---|---|---|---|---|
yes | France | Lyon | ad_site | Lyon-? | DN | *OU=MAR* |
no | France | Paris | local_ip | 192.168.10.0/24 | name | FR* |
yes | USA | Los Angeles | collector_tag | 200 | ||
no | USA | New York | name | US* | ip | 10.100.0.0/16 |
Each column in the CSV file means the following:
entity_rule
(case sensitive)When set to no, the rule assigns the device to both an Engine and an entity.When set to yes, the rule assigns the device to an entity, filtered by Engine.
Engine
(case insensitive)The name of the Engine to be assigned, as specified in the connection of the Portal to the Engines.
Entity (case sensitive)
The name of the entity to be assigned.
Field1
The name of the first device field on which to base the assignment.
Pattern1
The condition pattern that the first specified field must match for assigning the designated Engine and entity to the device.
Field2
The name of the second device field on which to base the assignment.
Pattern2
The condition pattern that the second specified field must match for assigning the designated Engine and entity to the device.
The columns Field1 and Field2 support the following values:
ip
The last IP address of the device. As pattern for the field, specify either:
A single IP address in dot-decimal notation. For example: 192.168.10.1.
A subnet in CIDR notation. For example: 192.168.10.0/24.
local_ip
The last local IP address of the device; that is, its IP address in the local network. Specify patterns in the same way as for the ip field.
name (case insensitive)
The name of the device.
collector_tag
The tag number assigned to the Collector during its installation. Only the exact number is matched.
collector_string_tag
The label assigned to the Collector during its installation. Supports pattern matching.
dn
The Distinguished Name of the device as reported by the Collector. The device must be part of a domain in Active Directory.
The format of the distinguished name reported by the Collector is the standard sequence of attribute=value elements connected by commas, from the most specific to the most general attribute. For instance:
CN=ex01,OU=Computers,DC=example,DC=orgIn contrast, when retrieved by the Engine from Active Directory, the Finder displays the distinguished name field of a device (or of a user) as a similar sequence in reverse order, with elements connected by a forward slash. The same example dn would give:
/DC=org/DC=example/OU=Computers/CN=ex01
ad_site
The Active Directory Site in which the device is located. A site represents one or more TCP/IP subnets.
The name, collector_string_tag, dn and ad_site fields support character pattern matching. To define the associated string pattern, use the following wildcards:
? : Substitutes a single character.
* : Substitutes zero or more characters.
To write the CSV file for the rules, use UTF-8 text encoding (max 20 MB). Avoid writing the rules on editors that create a BOM character at the beginning of the file (e.g. Notepad), as this results in a header error when uploading the file to the Portal.
After the header, write each rule in a new line, optionally enclose each item in double quotes (needed to escape special characters), and use the semicolon as delimiter. For instance, the CSV file of our example would look as follows:
"entity_rule";"Engine";"Entity";"Field1";"Pattern1";"Field2";"Pattern2"
"no";"France";"Paris";"local_ip";"192.168.10.0/24";"name";"FR*"
"yes";"France";"Lyon";"ad_site";"Lyon-?";"dn";"*OU=MAR*"
"no";"USA";"New York";"name";"US*";"ip";"10.100.0.0/16"
"yes";"USA";"Los Angeles";"collector_tag";"200";;
For a rule to be satisfied, conditions on both Field1 and Field2 must be fulfilled, that is, both patterns must match. The rule precedence is established from top to bottom, but their processing depends on whether Collectors have the use_assignment flag enabled:
If rule-based assignment is enabled in the Collector:
Non entity-only rules (i.e. entity_rule = no) are processed first, assigning the device to a particular Engine.
All rules that contain that particular Engine (e.g. France) are processed afterwards, assigning the device to the appropriate entity.
If rule-based assignment is disabled in the Collector:
The Collectors have their Engine assigned during installation and it does not change.
All rules that contain the Engine to which the Collector was assigned are processed, assigning the device to the appropriate entity.
Entity-only rules allow catch-all default cases to prevent assignments to the empty (-) entity from occurring; especially for sticky, roaming, or VPN devices.
To upload the resulting CSV file to the Portal:
Log in to the Portal as central administrator.
From the ADMINISTRATION menu at the top, select Collectors under SYSTEM CONFIGURATION.
Click Add new ruleset under the Rulesets section.
Fill in the fields in the dialog:
For RULE NAME, type in a unique name for the rule.
Optional: In DESCRIPTION, describe the purpose of the rule.
Under CSV FILE, click Upload new file and select your previously created CSV file.
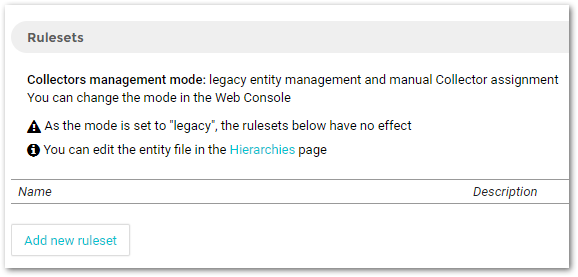
Simulating Collector assignment
For a seamless transition from manual to rule-based Collector assignment and to avoid unexpected assignments, simulate your rules in the Portal. The simulation of Collector assignment rules lets you see what the effect of applying the rules would be, without actually changing the currently assigned Engines and entities.
Warning: If you are migrating from legacy to rule-based assignment, do not switch on rule-based assignment in the Collectors yet. Wait until rule-based assignment is fully activated. Otherwise, functions that depend on the TCP connection of the Collector, such as Engage, Act or Updates, will not work properly.
The simulation of assignment rules is thus specially useful in two situations:
When switching from manual to rule-based assignment.
When testing a new set of rules.
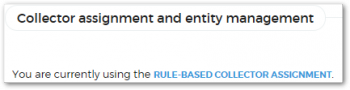
Therefore, before completely switching to rule-based assignment, try the so-called simulation mode. In simulation mode, Collector assignment is still manual, but the Portal lets you simulate the effect of assignment rules. Safely evaluate the readiness of your setup and the convenience of switching to rule-based assignment thanks to simulation mode.
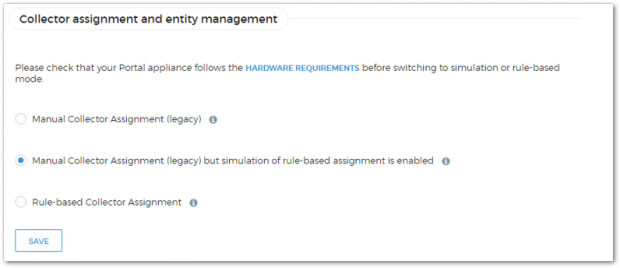
To activate simulation mode:
Log in to the Web Console of the primary Appliance as administrator.
In the Appliance tab, select Collector management from the left-hand side menu.
Select Manual Collector Assignment (legacy) but simulation of rule-based assignment is enabled.
Click SAVE. Saving your changes restarts the Portal and all Engines.
To simulate your own assignment rules, write the rules in a CSV file and upload it to the Portal as explained in the previous section. From the same Collectors page in the Portal, find your newly created ruleset on the list and click simulate. The results of the new assignment are displayed.
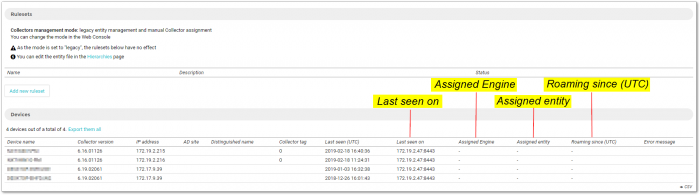
Discovering your Collectors
While in simulation mode, see the list of Collectors that have a working TCP connection (UDP-only Collectors are not visible here yet):
Log in to the Portal as central administrator.
From the ADMINISTRATION menu at the top, select Collectors under SYSTEM CONFIGURATION.
See the list of devices whose Collector is communicating with the Portal under Devices. Only the first 100 devices are displayed.
Optional: Click → CSV to get the full list of devices.
The columns of the table offer you current information about the assignment status of the Collectors. These columns include the properties of the Collector: Device name, Collector version, IP address (the last one), AD Site, Distinguished name and Collector tag. In addition, find other columns that are useful to know about the assignment status of the Collector:
Last seen (UTC)
The time of the last assignment request received from the Collector.
Last seen on
The IP address and port of the appliance where the Collector was last seen.
Assigned Engine
The Engine to which the Collector was told to report.
Assigned entity
The entity to which the Collector currently belongs.
Roaming since (UTC)
Time at which the device started roaming.
Error message
Last error in the assignment of the Collector.
Activating Collector assignment
To definitively activate rule-based Collector assignment:
Log in to the Web Console of the primary Appliance as central administrator.
In the Appliance tab, select Collector management from the left-hand side menu.
Select Rule-based Collector Assignment.
Click SAVE. Saving your changes restarts the Portal and all Engines.
Beware that, once you activate rule-based Collector Assignment, there is no way to revert to manual assignment except by reinstalling the whole product. Indeed, once in rule-based mode, the other options disappear from the Collector management page in the Web Console:
Current active rules are then enforced, but remember that you can always simulate new rules before applying them. To apply a new set of rules, write and upload a new CSV file to the Portal, as explained in the previous section, and click activate from its entry on the list of rules in the Collectors page of the Portal. In the definitive rule-based mode, the Collectors page displays all Collectors, including those that do not have a working TCP connection, but a UDP only connection.
After activating rule-based Collector assignment in the Web Console, note that TCP connection related functions such as Engage, Act or Updates will not work on a particular Collector until the Collector has been properly assigned to an Engine. Use a configuration management tool to enable rule-based assignment in all your Collectors by setting the USE_ASSIGNMENT property to enable.
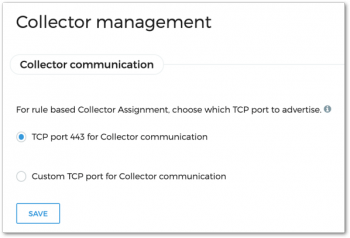
Specifying the Collector Assignment port
Once you have activated rule-based Collector assignment, specify the TCP port where each Engine advertises the assignment service:
Log in to the Web Console of each Engine as central administrator.
In the Appliance tab, select Collector management from the left-hand side menu.
Under Collector communication:
Select TCP port 443 for Collector communication when Collectors are configured to communicate via the default TCP port 443.
Select Custom TCP port for Collector communication when Collectors are configured to communicate via a custom TCP port.
Click SAVE.
Reassignment
Once the Portal has successfully assigned an Engine to a Collector, the Collector receives new assignment information from its assigned Engine, which in turn receives it from the Portal. The Collector asks for new assignment information every time that its TCP connection to the Engine is interrupted.
In addition, starting from V6.25, Collectors can be dynamically reassigned to another Engine every time that the assignment rules change. The distribution of reassignment messages to Collectors may take up to 60 minutes.
On the other hand, to limit the number of undesired Engine switches, the reassignment of a device that changes its properties (e.g. IP address) is delayed for a default of 10 days after a new rule takes over. This is especially important for devices that change frequently of subnet, such as the laptops of roaming users. Learn how to configure the stickiness of devices to their assigned Engines in the article about the assignment of roaming Collectors.
Assignment failure scenarios
Assignment bound to wrong IP address in Appliance
In Nexthink Appliances with multiple network interfaces, it may happen that rule-based assignment is bound to the incorrect network interface. Usually, rule-based assignment should bind to the same IP address to which the specified Internal DNS Name the Portal. However, during a fresh installation of the Portal, rule-based assignment may choose the wrong interface while the Internal DNS name is still not configured.
To know whether the communication between the Portal and the Engines is working for rule-based assignment, activate first simulation mode or rule-based assignment from the Web Console, as explained above, and then:
Log in to the CLI of the primary Appliance (i.e. the Portal).
Query the rule:
nxconsul members
3. Verify that the output lists all the Appliances, Portal and Engines, within your setup.
4. Check the Status column of all entries display alive.
If you do not see the full list of Appliances or they are not all alive, edit the configuration file of nxconsul. Still from the CLI of the primary Appliance:
Open the configuration file for editing:
sudo vi /var/nexthink/nxconsul/conf/base-config.jsonVerify that the first line of content holds the IP address that rule-based assignment should use:
"advertise_addr": "172.19.2.47",If this is not the case, edit the IP address.
Move the cursor to the beginning of the IP address with the keys h-j-k-l (respectively, move left, up, down and right).
Type i for inserting.
Repeatedly press Delete to erase the wrong IP address.
Type in the correct IP address.
Press Esc.
To save your changes and exit, type in:
:wqRestart:
nxconsulsudo systemctl restart nxconsul
Changes in the IP address of the Appliance
Once the primary Appliance configures its IP address for rule-based assignment, an alteration of its actual IP address (because of a network change, for instance) does not automatically update the configured IP address. This results in rule-based assignment malfunction because nxconsul is unable to elect the primary Appliance as leader.
To verify that nxconsul cannot elect a leader:
Log in the CLI of the primary Appliance.
In file /var/nexthink/nxconsul/logs/nxconsul.log, look for the message:
[ERR] agent: failed to sync remote state: No cluster leader
To manually update the IP address of the Appliance:
Open the configuration file for editing:
sudo vi /var/nexthink/nxconsul/conf/base-config.jsonLook for the line that holds the old IP address of the Appliance. For instance:
"advertise_addr": "172.19.2.47",Insert the new IP address.
Move the cursor to the beginning of the IP address with the keys h-j-k-l (respectively, move left, up, down and right).
Type i for inserting.
Repeatedly press Delete to erase the old IP address.
Type in the new IP address.
Press Esc.
To save your changes and exit, type in:
:wqRestart nxconsul
sudo systemctl restart nxconsul
Collector failing to connect to assigned Engine
When a Collector gets a new assignment, the Collector tries to establish a TCP connection to its assigned Engine using the first external DNS name specified for the Engine as destination. If the Collector is unable to contact the assigned Engine after three retries, the Collector resorts to its previously assigned Engine (or to the Portal, in case of first assignment) to report the failure and waits for a new assignment on standby. While on standby, the Collector sends no activity traffic.
To see if any assignment of a Collector to an Engine has failed:
Log in to the Portal as central administrator.
From the ADMINISTRATION menu at the top, select Collectors under SYSTEM CONFIGURATION.
Locate the list of assigned Collectors under Devices.
Optional: In the column Message, look for list entries with the error message:Last assignment failed: engine [IP address] tcp port [number]: ...
Because only 100 devices are displayed, click → CSV at the bottom right to get the full list of devices and look for the error message in the same column of the exported CSV file.
RELATED TASKS
RELATED REFERENCE
RELATED CONCEPT