.png)
Installing the Collector on Windows
Overview
You must install the Collector in all the Windows devices from which you want to get end-user analytics. Depending on the number of devices and their geographical location in your corporate network, the installation of the Collector may be a technically challenging task.
For small setups or particular cases, you may opt for installing the Collector individually on each device. For medium to large setups, the installation of the Collector usually requires the use of automated deployment tools in practice.
To keep your Collectors up-to-date, either rely on the same deployment tools that you used for their installation or on the automated update proposed by Nexthink.
Applies to platforms | Windows |
Prerequisites
You need:
One or more Windows devices on which to install the Collector.
The Nexthink Collector Installer (recommended) or the Collector MSI packages.
The Customer Key and Root Certificate of the primary Appliance. These are essential to enable the complementary TCP connection of the Collector with the Engine. Read this article if you need to install the Collector as part of a POC, before having installed the definitive primary Appliance.
Optional: A third-party automated deployment tool. Instructions on how to install the Collector via SCCM 2007, SCCM 2012, and GPO (Active Directory) are provided.
Find the Nexthink Collector Installer and the Collector MSI packages inside the Collector zip file available in the Product Downloads page of Nexthink:
Open your favorite web browser.
Navigate to the official Nexthink documentation web site: doc.nexthink.com.
Click Product download in the top right corner of the main documentation page, above the search tool.
In the Nexthink Help Center, click the Product Downloads section.
Sign in with your customer credentials.
Click the first entry of the Latest V6 releases list.
Optional: Click the link to the release notes of the Collector to learn about the new features and bug fixes.
Under Download links, find the Collector section.
Click to download the Collector package for Windows.
Optional: Verify your download with the provided SHA-256 hash.
Extract the contents of the downloaded collector-6.x.x.x.zip file.
Find the Nexthink Collector Installer in the Installer\Collector folder. This is the recommended tool for generating an executable that embeds the Collector MSIs and the custom configuration options in a single bundle to easily deploy the Collector. Two versions are provided:
NEXThink_Collector_Installer_Silent.exe (recommended), to generate silent Collector installers. When deploying the Collector on a device, a silent installer renders the installation procedure unnoticeable to the end user of the device.
NEXThink_Collector_Installer.exe (for debugging), to generate installers that open a command-line window.
Find the Collector MSI file, NEXThink_Collector.msi, in the folders:
x64\signed (64-bit version)
x86\signed (32-bit version).
Download the Customer Key and default Root Certificate from the primary Appliance:
Log in to the Web Console of the primary Appliance as admin.
Select the Appliance tab at the top of the Web Console.
Click Collector management in the left-hand side menu.
Under Collector default certificates at the bottom of the page, click the buttons DOWNLOAD CUSTOMER KEY and DOWNLOAD DEFAULT ROOT CERTIFICATE to download, respectively, the text files holding the Customer Key and the default Root Certificate of the primary Appliance (the latter is required only if you did not replace the certificate for the TCP communication channel of the Appliances with the Collector).
You need to know:
The DNS name or IP address of the Appliance that hosts the Engine or, if rule-based collector assignment is turned on, of the Appliance that hosts the Portal. The name or IP address must match the External DNS name of the Engine or the External DNS name of the Portal, respectively.
TCP port number for the connection of the Collector with the Appliances (default 443).
Optional: UDP port number where the Engine is listening for the Collector (default 999, but prefer TCP-only).
Deploying the Collector using the Nexthink Collector Installer
The Nexthink Collector Installer is a tool that helps you deploy the Collector by producing a standalone executable file that holds the MSI files of both the 32-bit and 64-bit versions of the Collector. Therefore, you can use the same executable to install the Collector on any device that runs a supported version of Windows.
To generate the executable, use the graphical interface of the Nexthink Collector Installer to set the installing options of the Collector:
Double-click the appropriate Nexthink Collector Installer executable file for generating either:
A silent installer: Nexthink_Collector_Installer_Silent.exe (recommended).
A installer that opens a command-line window: Nexthink_Collector_Installer.exe.
In either case, the following dialog shows up:
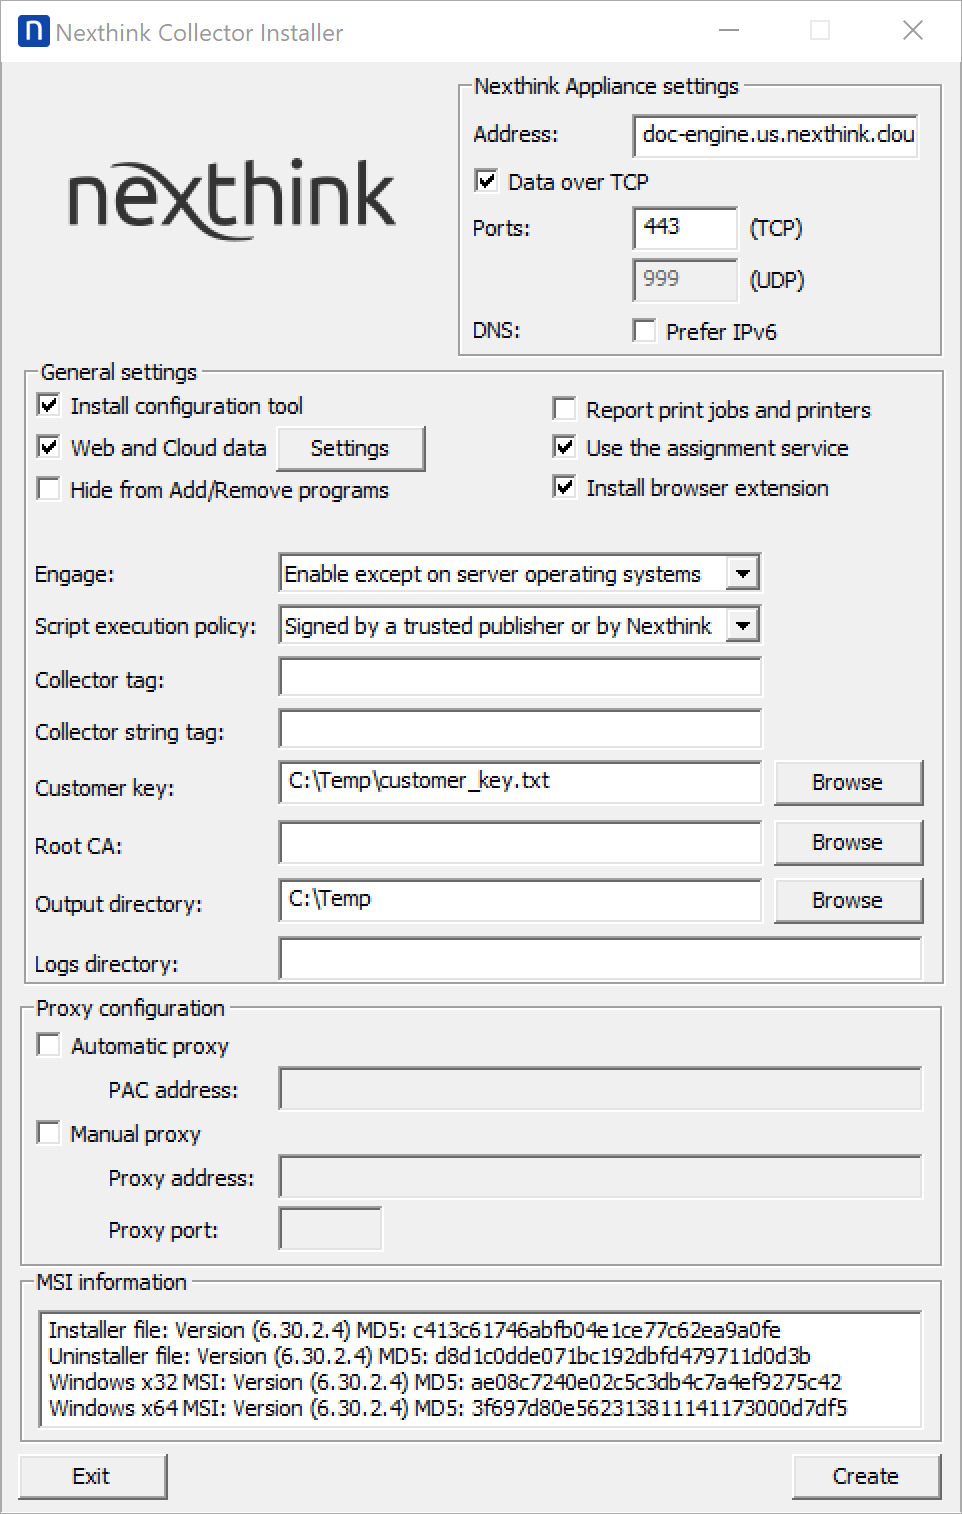
Specify the configuration settings of the Appliance that will receive Collector information under Nexthink Appliance settings. If the rule-based collector assignment is turned on, use the settings of the Portal; otherwise, use the settings of the Engine:
Address: DNS name or IP address of the Appliance (it must match the External DNS name of the Portal or the Engine).
Data over TCP: Tick the option to convey end-user data through the TCP channel of the Collector (default), instead of the UDP channel.
Ports (TCP): Port number on which either the Portal or the Engine listens to the TCP channel of the Collectors.
Ports (UDP): Port number on which the Engine listens to the UDP channel of the Collectors. Only enabled if Data over TCP is not checked.
DNS: Tick the option Prefer IPv6 if you want the Collector to favor the use of IPv6 over IPv4 to communicate with the Appliances when the name of the Appliances resolve to both IPv6 and IPv4 addresses.
Set the General settings. Optionally tick the box for any additional setting. In particular:
Installation options which are not shown in the dialog take their default value. Check Install configuration tool to modify them later with the Collector Configuration Tool. In the case of an update, the values of the non-visible settings are preserved from the previous installation.
Check the option Web and Cloud Data if you have purchased the Web and Cloud product. Furthermore, click the button Settings to the right of this option to open a dialog where you can list the domains for which you want to store the full URL paths of web requests. That is, for every web request that falls under one of the specified domains, the Collector reports the full URL path to the Engine and not just the domain.
Check the option Report print jobs and printers to enable print monitoring. Starting from V6.18, reporting print information is disabled by default.
Check the option Use the assignment service if you activated the rule-based assignment of Collectors.
Select the activation of the Engage features depending on the target operating system:
Enable except on servers: the Collector launches campaigns only on devices that do not run a server OS.
Enable on all devices: the Collector launches campaigns on devices with any type of operating system.
Disable: the Collector ignores campaigns.
Select the Script execution policy for remote actions that the Collector will run on the device:
Signed by a trusted publisher or by Nexthink (default): the Collector runs on the device only those remote actions with a PowerShell script that is signed either by Nexthink or by a company whose certificate is listed in the Trusted Publishers certificate store.
Signed by a trusted publisher: the Collector runs on the device only those remote actions with a PowerShell script that is signed by a company whose certificate is listed in the Trusted Publishers certificate store.
Disabled: the Collector runs no remote action on the device.
Unrestricted: the Collector runs any remote action on the device, regardless of the digital signature of its script.
Optional: Type in an integer number (0 to 2147483647) as Collector tag to identify the group of Collectors generated with the installer. The Collector tag is visible in the Finder and is useful for defining the entities to build up hierarchies.
Optional: For more flexibility in the identification of Collectors, type in a label (max 2048 characters) as Collector string tag to identify the group of Collectors generated with the installer. The Collector string tag is visible in the Finder and is useful for defining the entities to build up hierarchies.
Choose the files that protect the non-traffic information (TCP connection) of the Collector to the Engine:
Customer Key: Click Browse to select the file that holds the Customer Key of the primary Appliance.
Root CA: Click Browse to select the file that holds the default Root Certificate of the primary Appliance. If you leave this field empty, the Collector assumes that you replaced the server certificates in the Engine and falls back to using the Windows Trusted Root Certification Authorities Store for verifying the certificates presented by the Engine (the secondary) Appliance.
Finally, specify a couple of directories:
Ouptut directory: Click Browse to select the folder where to create the executable files for installing and uninstalling the Collector.
(Optional) Logs directory: Type in the network place where the Collectors deployed with this method will write their installation logs.
Optionally provide the custom proxy settings of the Collector under the Proxy configuration section:
Tick Automatic proxy to provide a PAC file for the automatic configuration of the proxy settings.
PAC address: type in the URL of the PAC file.
Tick Manual proxy to manually provide the proxy settings.
Proxy address: Type in the FQDN or IP address of the proxy.
Proxy port: Type in the port number where the proxy is listening.
Click Create, three files are generated:
NEXThink_Collector[engine_address].exe: Executable file to install the Collector.
NEXThink_Collector_Uninstaller[engine_address].exe: Executable file to uninstall the Collector.
NEXThink_Collector[engine_address].exe.txt: Text file with the list of the settings used to create the executable installer.
Click OK to close the dialog.
Nexthink Collector Installer error codes
The installer executable returns one of the following values:
0: Success; reboot is not required.
-1: Success; reboot is required.
3: Failure; Collector installation has started but msiexec failed.
other: Failure; the actual value corresponds to a Windows Internal error code.
The uninstaller executable returns one of the following values:
0: Success; reboot is not required.
-1: Success; reboot is required.
1: Success; Collector was not found (nothing was uninstalled).
3: Failure; Collector uninstallation has started but msiexec failed.
other: Failure; the actual value corresponds to a Windows Internal error code.
Remember that rebooting is usually not required when installing the V6 Collector. The installer requires you to reboot a device only if you are upgrading from the V5 Collector or if the Control Panel extension of the Collector was running during installation.
Deploying the Collector through SCCM
In this section, learn how to deploy the Collector over groups of end-user devices using Microsoft System Center Configuration Manager. The instructions assume that you are a systems administrator with a basic understanding of the Windows operating system and deploying enterprise software, and that you are familiar with SCCM. The present documentation covers the deployment of the Collector with SCCM 2012 and SCCM 2007. For other versions of SCCM, the procedure may be slightly different. Please refer to the section on deploying software packages in the user manual of your specific version to deploy the Collector.
The deployment of the Collector SCCM requires you to provide an executable file that is responsible for the actual installation of the Collector in your devices. To generate this executable, use the Nexthink Collector Installer described above.
Deploying the Collector through SCCM 2012
Create a collection of devices:
Click the Windows Start button, go to the Microsoft System Center 2012 program group, and run the Configuration Manager console.
In the Assets and Compliance workspace on the left-hand side of the main panel, right-click Device Collections and select Create Device Collection.
On the General page of the Create Device Collection Wizard, specify the following fields:
Name: Type in a unique name for the collection.
Optional Comment: Type in a meaningful comment (e.g. Deployment for the Nexthink Collector).
Optional Limiting collection: Click Browse to select a collection that puts a limit on the members of the current collection or select All systems in order not to limit the current collection.
Create a boundary and add it to a boundary group:
In the Configuration Manager console, go to the Administration workspace.
Right-click Boundaries and select Create Boundary.
Define the boundary by setting additional restrictions on the target devices in which to push the software installation (e.g. by IP address range).
Right-click Boundary Groups and select Create Boundary Group.
Type in a name for the group.
Add the previously created boundary to this group.
Optional: Verify that you added the correct number of devices to the group by looking at the value in the column Member Count.
Create the application to install:
In the Configuration Manager console, go to Software Library workspace.
Right-click Applications and select Create Application.
Choose the option "Manually specify the application information".
Specify the location and name of the application (in our case, the name should be Nexthink_Collector_Installer_Silent.exe). The new application is added to the list of available applications.
Now the new Application should appear in the list. When you click it, there is a Deployments tab at the bottom of the window. Later this tabs will show a list of deployments of this application to different device groups.
Distribute and deploy the Application:
In the list of Applications, right-click the previously created Collector application and select Distribute Content. The distribution wizard opens.
Confirm the correct executable file of the installer (Nexthink_Collector_Installer_Silent.exe).
As Content Destination, select Distribution Point.
Specify the shared folder that holds the installer.
Optional: Survey the distribution process from the Configuration Manager console.
In the main panel, navigate to Monitoring > Distribution Status > Content Status.
Click the application that you have just distributed. If you see Success and a green colored graph below, you can now deploy the application.
Back in the Software Library workspace, navigate to Applications.
Right-click the Collector application and select Deploy.
Select the collection of devices that you created earlier.
If you cannot see your collection in the list, switch from "User Collections" to "Device Collections".
Check that the distribution point is correct and click Next.
Set Action to Install and Purpose to Required and click Next.
Set the Schedule to an appropriate moment for starting the deployment (e.g. As soon as possible) and click Next.
Tick Software installation and click Next.
Accept the default options for the rest of the wizard.
Optional: Check the status of your deployment in the Deployments tab at the bottom of the window.
To verify the deployment on a client device:
Log in to the client device and wait for the pop-up notification about installation of new software.
To speed up this process a little bit, you can manually force the software deployment evaluation cycle in the SCCM client:
Open the Control Panel.
Navigate to Configuration Manager and click the Actions tab.
Choose Machine Policy Retrieval & Evaluation Cycle and click Run Now.
Choose Application Deployment Evaluation Cycle and click Run Now
To debug the deployment process and see its log files, check the following:
On the server machine, open the SCCM utility to view log files:
C:\Program Files\Microsoft Configuration Manager\tools\cmtrace.exe
The server logs are stored in:
C:\Program Files\Microsoft Configuration Manager\Logs\
On the client machine, the logs are stored in one of these three paths:
C:\Windows\CCM\C:\Windows\ccmsetup\C:\Windows\ccmcache\
If your deployment is not successful, check the following troubleshooting points:
In the Configuration Manager console, navigate to Administration > Site Configuration > Servers and Site System Roles and choose your server. In the table below, right-click Distribution point and select Properties. In the Boundary Groups tab, verify that boundary group that you previously created is listed in the Boundary Groups list. If not, add it to the list.
In the Configuration Manager console, navigate to Software Library > Applications. Right-click the Collector application and select Properties. Verify the following points:
In the Distribution Settings tab, make sure that the option Distribute the content for this package to preferred distribution points is ticked.
In the Content Locations tab, make sure that your distribution point (the path to your shared folder) is in the table. If not, add it, and click Redistribute.
If the remote installation fails with error code 0x87d00324 (displayed in Software Center on the client machine), the installation itself was in fact successful and the Collector should be running. It is the mechanism for detecting the installation of the application which failed. In this case, check the detection criteria:
In Software Library, right-click the deployed Collector application and select Properties.
In the tab Deployment Types, double-click the installer script in the list Detection Method.
Check if the detection method is configured correctly. Since you are using the Collector installer executable, the detection should be done by registry key.
Deploying the Collector through SCCM 2007
Create a collection of devices:
Click the Windows Start button, go to All Programs, select Microsoft System Center, select Configuration Manager 2007 and then select ConfigMgr Console.
In the Configuration Manager Console, navigate to System Center Configuration Manager / Site Database / Computer Management.
Right-click Collections, and then click New Collection.
On the General dialog box of the New Collection Wizard, enter a name for the collection.
Click Next and click the computer icon, which opens the Create Direct Membership Rule Wizard. Click Next.
On the Search for Resources dialog box:
Click the Resource class drop-down menu and select System Resource.
Click the Attribute name drop-down menu and select Name.
In the Value field enter %, and then click Next.
On the Collection Limiting dialog box, click the Browse... button, select All Windows Workstation or Professional Systems, and then click Next.
On the Select Resources dialog box, select the check box for each of the targeted computer resources.
Click Next, and then on the Finished dialog box, click Finish.
On the Membership Rules dialog box of the New Collection Wizard, click Next.
On the Advertisements dialog box, for now, do not assign an advertisement because it is not yet created.
Click Next. On the Security dialog box, accept the defaults, click Next, and then click Close.
Create a package source directory:
Click on the Start button, go to All Programs, select Microsoft System Center, select Configuration Manager 2007 and then select ConfigMgr Console.
Navigate to System Center Configuration Manager / Site Database / Computer Management / Software Distribution.
Right-click Packages, point to New, and then click Package.
On the General dialog box of the New Package Wizard, enter the:
Name
Version
Manufacturer
Language
Click Next and do the the following:
Select This package contains source files.
Click the Set button and then enter the path for the location of the source files in the Source directory field.
Click Next and accept the default settings on all of the following dialog boxes: Data Access, Distribution Settings, Reporting, and Security.
On the Wizard Completed dialog box, click Close.
To use a server as a distribution point for providing packages to distribute packages to your client computers, first designate a site system as a distribution point. To select a distribution point for the newly created package:
Right-click Distribution Points, click New Distribution Points, click Next, and then click the check box for the distribution point.
Click Next. Upon completion of the New Distribution Points Wizard, click Close.
Create a program with setup and install parameters:
Right-click Programs, point to New, and then click Program.
On the General dialog box:
Enter a name for the package in the Name field.
In the Command line field, browse and select the executable file that you have previously generated with the Nexthink Collector Installer.
In the Run field, click the drop-down menu and select Hidden.
In the After running field, verify the default of No action required is selected.
Click Next and accept the defaults on the Requirements dialog box.
On the Environment dialog box:
Click the Program can run drop-down box and select Whether or not a user is logged on. This will enable Run with administrative rights for the Run mode.
Leave the default for Drive mode to Runs with UNC name.
Click Next.
On the Advanced dialog box, select the check box for Suppress program notifications, and then click Next.
To view the Summary dialog box, click Next.
To finish the process of creating the new program, click Next, which will then display the Wizard Completed dialog box.
To exit from the New Program Wizard, click Close.
Verify that the package was installed on the distribution point, by:
Navigating to System Center Configuration Manager, Site Database, Computer Management, Software Distribution, Packages, Collector package name, Package Status, Package Status.
Checking the status changing from Install Pending to Installed.
Create the advertisement:
Right-click Advertisements, point to New, and then click Advertisement.
On the General dialog box of the New Advertisement Wizard:
Enter a name for the advertisement in Name field.
Click the Browse button for the Package field, and click on the package you want to advertise and then click OK.
Click the Browse button for the Collection field, click on the collection.
Click OK, and then click Next.
On the Schedule dialog box, enter the date and time in the Advertisement start time fields for when the advertisement will begin, and then click the asterisk button for Mandatory Assignments.
On the Assignment Schedule dialog box, click the Schedule button and enter the same date and time that you previously entered in the Advertisement start time fields on the Schedule dialog box.
To return to the Schedule dialog box, click OK.
Accept the default values on the Distribution Points, Interaction, Security, and Summary dialog boxes.
Upon successful completion of the New Advertisement Wizard, click Close on the Wizard Completed dialog box.
On the client, wait for the next Machine Policy Retrieval & Evaluation Cycle.
Test your results:
Go to a the target PC that is member of the Collections you have created to deploy.
Click Start, Run and type eventvwr.msc to show the event viewer message.
In the left pane of the Event Viewer, select Application, you will see some source events MsiInstaller logged as a Success Audit event.
If you get any error, see the error log generated in C:\Windows\Temp\Msi.log.
Optionally, remove the package:
Open the Systems Management Server console and expand the Package that contains the Collector.
Open the Program Properties dialog box, and then on the General tab:
In the Command line field, browse and select the Collector file.
The package will be removed silently at the next Machine Policy Retrieval & Evaluation Cycle from the end-user device.
Deploying the Collector through GPO
In this section, learn how to deploy the Collector over large groups of end-user devices using a standard Windows technology such as Active Directory Group Policy. The instructions assume that you are a system administrator with a basic understanding of the Windows operating system and the deployment of enterprise software.
Create a distribution point:
Log in to the server as an Administrator user.
Create a shared network folder.
Set permissions on this folder in order to allow access to the distribution package.
Copy the MSI of the Collector to the shared folder.
Generate transform files (MST) for controlling the options passed to the MSI for installation. Use the Orca utility from Microsoft to generate the MST, for instance.
Copy the generated MST to the shared folder.
Create a Group Policy Object:
Click on the Start button, go to All Programs, select Administrative Tools and then select Active Directory Users and Computers.
Right-click your domain name in the console tree, select New and click Organizational Unit.
In the New Object dialog box, type a descriptive name for the new organizational unit, and then click OK.
In the right panel, select Computers and click on the computer that you want add to your Organizational Unit.
Drag and Drop these computers in the name of the Organizational Unit created. In the right panel, select Nexthink_Collector_Deploy, you will see all the computers tied to your Organizational Unit.
Click on the Start button, go to All Programs, select Administrative Tools and then select Group Policy Management.
Right-click your domain name in the console tree and select Create a GPO in this domain, and Link it here....
In the New GPO dialog box, type a descriptive name for the new policy, and then click OK.
Assign an MSI package:
Click on the Start button, go to All Programs, select Administrative Tools and then select Group Policy Management.
Right-click your GPO name and select Edit....
On this Group Management Editor, expand Computer Policies, Software Settings and Software Installation, select New and then click Package....
In the Open dialog box, browse to the distribution point you created for the Nexthink Collector during the distribution point.
Select the MSI file containing the Collector installer you want to deploy, and then click Open.
In the Deploy Software dialog box, select Advanced, and then click OK.
In the Properties dialog box for the package you created.
Click the Deployment tab, and then select Uninstall this application when it falls out of the scope of management.
Click Advanced on the Deployment tab, choose Ignore language when deploying this package, uncheck the option Make this 32-bit X86 application available to Win64 machines, and then click OK.
On the Modifications tab, specify any modification transforms you want to apply when the package is installed by clicking Add and then opening each transform from its network location.
On the Security tab, verify the name(s) of any computer(s) to which you are assigning software.
Click OK to close the Properties dialog box.
In the Group Policy dialog box, expand Computer Configuration, Administrative Templates, and Windows Components.
In the Windows Components folder, select Windows Installer.
Select Always install with elevated privileges.
Select Properties.
In the Always install with elevated privileges Properties dialog box, click the Setting tab, select Enabled, and then click OK.
In the Windows Installer panel of the Group Policy dialog box, right-click Logging, and then select Properties.
In the Logging Properties dialog box, on the Setting tab, select Enabled.
Then, in the Logging text box, type iweaprcv.
Click OK to close the Logging Properties dialog box.
In the Group Policy dialog box, click File, and then click Exit.
Note: The GPO must be propagated to the Active Directory Global Catalog and then to the individual computers. For this reason, allow 5-10 minutes before restarting the computers to which you are assigning the Nexthink Collector, or plan to restart the client computers twice before the system policies are synchronized.
Test your results:
Go to a the target PC that is member of the OU you tied the policy to.
Click Start, Run and type gpupdate /force.
A logoff or a restart message will appear: type Y and Enter.
When you restart, you should see the message Installing Nexthink Collector... for about a minute depending on the speed of your network and pc.
Click Start, Run and type eventvwr.msc to show the event viewer message. In the left pane, select Application, you will see some source events MsiInstaller logged as a Success Audit event.
If you have some errors, go to C:Windows/Temp/Msi.log and see the error log generated.
Sometimes you may need to redeploy a package (for example when doing an upgrade). To redeploy a package:
Click the Start button, go to Programs, select Administrative Tools and then select Group Policy Management.
Right-click your domain name in the console tree and select the Properties context menu.
Go to the Group Policy tab, select the object you used to deploy the package and click Edit.
Expand the Software Settings element (per-user or per-machine) which contains the deployed package.
Expand the Software Installation element which contains the deployed package.
Right-click the package in the right pane of the Group Policy window.
Select the All Tasks menu and click Redeploy application.
Click the Yes button for reinstalling the application wherever it is installed
Close the Group Policy Management Editor, click OK and exit the Group Policy Management.
Note that the GPO must be propagated to the Active Directory Global Catalog and then to the individual computers. For this reason, allow 5-10 minutes before restarting the computers to which you are assigning the Collector, or plan to restart the client computers twice before the system policies are synchronized.
Optional, remove a package:
Click on the Start button, go to Programs, select Administrative Tools and then select Group Policy Management.
Right-click your domain name in the console tree and select the Properties context menu.
Go to the Group Policy tab, select the object you used to deploy the package and click Edit.
Expand the Software Settings element (per-user or per-machine) which contains the deployed package.
Expand the Software Installation element which contains the deployed package.
Right-click the package in the right pane of the Group Policy window.
Select the All Tasks menu and click Remove.
Select from the following options:
Immediately uninstall the software from users and computers.
Allow users to continue to use the software but prevent new installations.
Click the OK button to continue.
Close the Group Policy Management Editor, click OK and exit the Group Policy Management.
Note that the GPO must be propagated to the Active Directory Global Catalog and then to the individual computers. For this reason, allow 5-10 minutes before restarting the computers to which you are assigning the Collector, or plan to restart the client computers twice before the system policies are synchronized.
Installing the Collector on a single device
Use the Collector MSI package to install the Collector either in interactive mode or in silent (also known as unattended) mode. In the latter case, no user interaction is required once the installation process is started.
This method of installing the Collector individually in every device is very tedious for large setups. Therefore, we only recommend it for proofs of concept or testing purposes.
To install the Collector in interactive mode:
Double-click the Nexthink Collector MSI file (NEXThink_Collector.msi) to start the installation program.
After reading the welcome message, click Next.
Fill out the form of installation settings:
Appliance Name or IP address: Type in the DNS name or IP address of the Appliance (the Portal, if rule-based collector assignment is turned on; the Engine, otherwise). Respectively, this setting must match either the External DNS name of the Portal or the External DNS name of the Engine.
Appliance TCP Port: Type in the port number on which either the Portal or the Engine listens to the TCP channel of the Collector. Default is 443, but alternatively you can select a custom TCP port that does not require root permissions (that is, a port number above 1024). Starting from V6.24, the UDP channel is no longer proposed for this installation method.
Customer Key: Copy to this field the contents of the Customer Key file previously downloaded from the primary Appliance. For instance:
Open the Customer Key file in the Notepad.
Press Ctrl+A to select all the text.
Press Ctrl+C to copy the text.
Back in the Customer Key field, press Ctrl+V to paste the copied key.
Root CA: Copy to this field the contents of the Root Certificate file previously downloaded from the primary Appliance. Use the same method described for copying the Customer Key.
If this field is left empty, the Collector assumes that you replaced the server certificates in the Engine and uses the Windows Trusted Root Certificates Store to validate the TCP channel connection to the Appliances. Replacing certificates is required if communicating via the default TCP port 443.
Optional: Tick the box Install Control Panel Extension.
It is best practice not to install the Control Panel Extension when deploying the Collector on a production environment. The Collector Control Panel Extension is an optional tool for assistance during troubleshooting or testing phase. It is not required by the Collector to work properly.
Click Next.
The installer is now ready; click Install to begin the actual installation.
Click Finish to close the installation once it has completed.
Starting from V6, the Collector does not require rebooting the device after installation or upgrade. Once the MSI has successfully installed the Collector, you are requested to reboot the device only if you are upgrading from V5 or if you were running a Collector component during installation (usually, the Control Panel extension).
Command-line silent installation
To install the Collector in silent mode: Use msiexec.exe on the command line to install the Collector in silent mode. The executable program msiexec.exe comes pre-installed with every Microsoft Windows operating system. Custom parameters are provided directly on the command-line and they are not saved from one installation to another. Therefore, this is not the recommended method to install the Collector, since commands are prone to typos. For a single installation, prefer the graphical installation method instead. For larger deployments with automated tools, we recommend to use MSI Transforms.
The mandatory parameters are:
DRV_IP: the IP address or DNS name of the Appliance that hosts either the Engine or, if rule-based collector assignment is turned on, the Portal.
It must match the External DNS name of the Engine or the External DNS name of the Portal, respectively.
DRV_PORT: port number on which the Engine listens to the UDP channel of the Collector.
CRD_PORT: port number on which the Appliance (Portal or Engine) listens to the TCP channel of the Collector.
CRD_KEY: the Customer Key downloaded from the primary Appliance.
CRD_ROOT_CA: the Root Certificate downloaded from the primary Appliance. Leave empty if you replaced the certificates in the Engine and want the Collector to use the Windows Trusted Root Certificates Store for validating its TCP connection with the Engine (the secondary) Appliance.
Here is an example of an unattended installation:
Type in the command line:
msiexec.exe /qn /i Nexthink_Collector.msi DRV_IP=192.168.84 DRV_PORT=999 CRD_PORT=8443 CRD_KEY=<Your_Key_Here> REBOOT=ReallySuppress
Wait for the installation process to complete.
The MSI now installs by default on any kind of Windows device, be it a laptop, a desktop, or a server.
For a comprehensive list of available options for the Nexthink Collector, see the Collector MSI Parameters reference.
See also: Windows Installer (msiexec.exe) Command-Line options Reference.
Deploying the Collector within a Windows reference image
When including the Collector in a Windows reference image remove the UID that the Collector may have generated to identify the device.
To ensure the removal of the device UID:
Log in to the Windows device with the Collector as a user with administrative rights.
Press the Windows button on your keyboard.
Type in cmd to make the Command Prompt application show up as a result of the search.
Right-click the Command Prompt icon to open a context menu.
Select Run as administrator from the menu.
From the prompt, stop the Collector by typing in:
nxtcfg.exe /stop
Remove the UID of the device:
reg delete "HKLM\SYSTEM\CurrentControlSet\Services\Nexthink Coordinator\params" /v uid
To the question Delete the registry value uid (Yes/No)?, answer by typing in yes.
The system will respond with either a confirmation that the operation was successful or with an error message if the Collector did not generate the UID yet.
Interaction of the Collector with other software
To get valuable information from a device, part of the Collector needs to run in a privileged mode as a kernel driver. Contrary to user applications, the programs that run in privileged mode can access the memory and the hardware of the device directly. Typically, these are the programs that control the peripherals in your device; such as the mouse, the keyboard, the hard disks or the network card. Other special programs, like antivirus software, may also need to run in privileged mode, at least partially. Errors in programs that run in privileged mode are not protected by the process isolation provided by the operating system and, therefore, may result in system failure. Moreover, since all of these programs share the same memory space, misbehavior of one of them can destabilize all the others.
The Collector has been carefully designed and thoroughly tested to avoid any kind of program errors. It has also been engineered following the best practices for the development of kernel drivers, behaving as a good citizen with respect to the other drivers that are loaded into the system. Still, in some very rare cases, an elusive programming error may defeat our rigorous testing process or a misbehaving third-party driver can trigger a fault in the Collector. In these unfortunate situations, the Collector may become unstable and possibly lead to a system failure in the device of the end-user.
CrashGuard Protection
To protect you against driver misbehavior, keep your Windows drivers up to date. Older versions of Windows drivers often contain more bugs that can lead to instabilities. If a third-party driver consistently destabilizes the Collector, the CrashGuard protection of the Collector helps you prevent your device from crashing again and again.
The CrashGuard mechanism increases a counter each time a session is abruptly terminated. An abrupt termination of a session is either a system crash (bluescreen) or a hard reset or power off. If a subsequent session is terminated correctly, the counter is reset to zero. Otherwise, the counter is increased again. When the counter reaches a given number of consecutive abruptly terminated sessions, the Collector cancels the loading of its drivers at system startup. Of course, the CrashGuard protection is only effective if it is really the Collector or its interaction with misbehaving software that is causing the system to crash.
On the other hand, if some end-users have acquired the bad habit of shutting their devices down unsafely, they may inadvertently induce the CrashGuard protection mechanism to wrongly deactivate the loading of the Collector by always ending up their sessions abruptly. To prevent these users from abusing the CrashGuard protection mechanism, optionally specify a CrashGuard protection time interval that starts being measured at system startup and after which the abrupt termination of a session does not increase the CrashGuard counter. This measure is effective if misbehaving users shut down their devices only after the protection time interval has elapsed; that is, if the protection time interval is shorter than their working day. The default value for the protection time interval is four hours.
Additionally, specify a reactivation time to load back a Collector that was previously deactivated by the CrashGuard protection. Take preventive measures during the period of deactivation to fix the issue that made the device crash so often. The Collector is loaded back again once the reactivation time has elapsed, on the next boot of the device.
Specify the parameters that control the behavior of the CrashGuard as arguments to the MSI of the Collector:
DRV_CRASHGUARD
Maximum number of consecutive abruptly terminated sessions after which the Collector cancels the loading of its drivers. Default is five sessions.
DRV_CGPI
The time interval in minutes after system startup during which the CrashGuard protection mechanism reckons abrupt terminations as genuine crashes. Default is 240 min (4 hours).
DRV_REACTIVATION
The waiting time in hours from the moment that the loading of the Collector is deactivated because the CrashGuard counter reached its maximum specified count until the moment it is reactivated. Default is 168 hours (7 days).
Modify the CrashGuard protection time interval with the Collector configuration tool on active devices after installation.
In any case, if you suspect that there is a compatibility problem between any of the drivers loaded into the end-user devices of your company and the Collector, please contact Nexthink Support.
The operations described in this article should only be performed by a Nexthink Engineer or a Nexthink Certified Partner.
If you need help or assistance, please contact your Nexthink Certified Partner.
RELATED TASKS
RELATED REFERENCES