.png)
Introducing the Web API V2
Overview
The Web API V2 is an HTTPS service that you invoke by issuing a POST or GET HTTP request to the Engine via the URL:
https://<Engine IP address or DNS name>:<Web API port number>/2/query
The service answers NXQL queries to the in-memory Engine database with a list of records in the selected output format. The default Web API port number is different for Engines that are either on-premises or on the Nexthink Cloud.
Default | On premises (V6.X) | 1671 |
Nexthink Cloud | 443 |
A request expects the following parameters:
query
The NXQL query to execute.
platform
Specifies the target platform of the query. Should the query target multiple platforms, supply the argument for as many platforms as required. Supported platforms are windows, mac_os and mobile.
format
The expected output format. Available formats are csv, html, xml and json.hrOptional: Boolean value that indicates whether the output should be human readable. When true, numerical values in the response are adapted to their best fitting units for better readability. The chosen units are also displayed along with the values. Not used in the JSON output format.
For instance, to execute the following NXQL query:
(select (device_uid name) (from device))
On an on-premises Engine whose IP address is known (e.g. 192.168.2.3), use the following Web API request. Note that the query must be URL-encoded:
https://192.168.2.3:1671/2/query?platform=windows&platform=mac_os&query=(select%20(device_uid%20name)%20(from device))&format=csv
To query an Engine on the Nexthink Cloud instead, you must specify its domain name. Use a Web API request with the format:
https://<customer>-engine-X.<region>.nexthink.cloud/2/query?platform=windows&platform=mac_os&query=(select%20(device_uid%20name)%20(from device))&format=csv
The Engine, whether on premises or on Cloud, returns the list of unique identifiers and names of all Windows and Mac OS devices in CSV format.
Template Parameters
Extra parameters p1, p2, etc. can be added to the query to replace placeholders %1, %2, etc. in the NXQL query. Use placeholders in place of the names of custom fields, names of categories or literal values for parameterizing queries that are used often.
For instance, the following NXQL query returns the name of all devices, as well as their associated keyword from a category that you pass as a parameter (select (name #%1) (from device))
Use the following Web API request to get the names of all devices and their Location keyword: https://<engine>:1671/2/query?query=(select%20(name%20%23%251)%20(from%20device))&p1=Location&format=csv
Authentication
Any account with Data Privacy set to none (full access) and the option Finder access enabled can make use of the Web API. Otherwise, the Web API will reject the credentials of the account. Moreover, only those users with the right to edit categories can perform updates through NXQL queries.
User credentials are verified with basic HTTP authentication. For a given user, the visibility and info levels are identical to those defined in their profile in the Portal.
Modification of accounts
Note that any change that you make in the Portal to an account is not immediately propagated to the Engine. The synchronization between Engine and Portal can take up to five minutes.
In practice, that means that you can have some temporary inconsistencies regarding the permissions of the accounts in Nexthink. For instance, if you remove Finder access from an account by changing its profile to prevent it from accessing the Web API, that account might still be able to query an Engine via the Web API for a few minutes before synchronization takes place and its credentials are invalidated.
HTTP Status Codes
The Web API V2 returns:
200 OK: If the request is successful;
400 Bad Request: If the request is invalid;
401 Not Authorized: If no credentials are provided or if they are not valid;
403 forbidden: If Web API is not licensed.
Examples of how to use the Web API
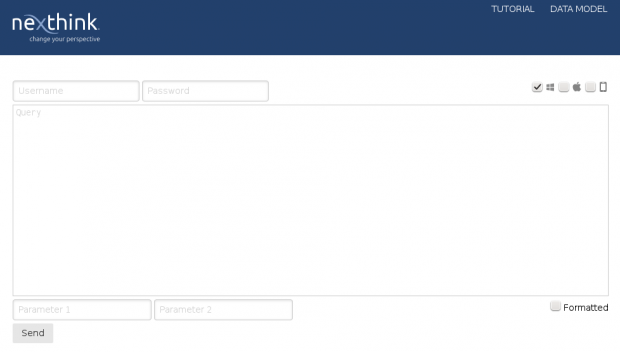
Testing the Web API V2 with the NXQL editor
The NXQL editor is a web-based user interface to the Web API V2. This useful editor lets you test the queries that you will later use in your integration projects. The NXQL editor is present in every Engine with the Integration tookit and you can access it from your favorite web browser by typing in the following URL:
https://<Engine IP address or DNS name>:<Web API port number>/2/editor/nxql_editor.html
To write a query in the NXQL editor:
Provide the user credentials. Type in the user name and password in the two text input boxes at the top. The access rights of the user associated to the supplied credentials apply to the query.
Select the platforms that your query targets by ticking the appropriate platform icons at the top right corner.
Type in your NXQL query inside the big text region in the middle.
If your query includes any placeholder for template parameters, specify the value of the parameters in the two text boxes below the query. Editor queries may include up to two template parameters.
Optional: Tick Formatted to get a human readable output (see hr parameter of Web API V2 requests above).
Click Send.
Once you send your query, the editor displays the message Loading... while the Engine is processing it. After a few seconds, depending on the speed of your connection, the complexity of your query and the load on the Engine, the response appears below the Send button in the same page of the NXQL editor:
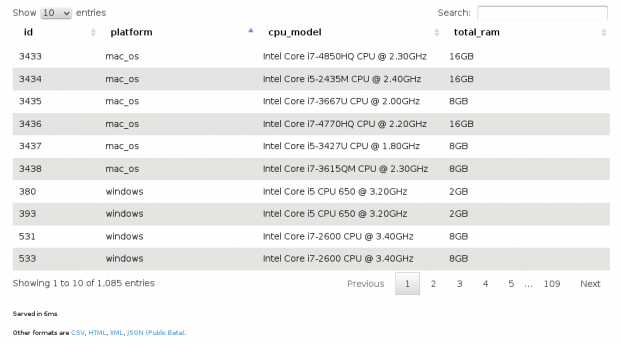
Choose the maximum number of displayed rows with the Show x entries picker.
Navigate through the result pages with the help of the buttons at the bottom right.
Order the results by column in ascending or descending order by repeatedly clicking the title of the column.
Click the Other formats options at the bottom left to get the results in CSV, HTML, XML or JSON format.
Using the Web API V2 with wget
The Web API V2 can easily be invoked using the classic UNIX tool wget. For instance, to retrieve the names of all devices in CSV format using wget, write the following command:
> wget --quiet \
  --no-check-certificate \
  --user=admin --password=admin \
  --output-document devices.csv \
  'https://our-engine-dns-name:1671/2/query?
   query=(select%20(id%20name)(from%20device))%20&
   format=csv&
   platform=windows&platform=mac_os'
Using the Web API V2 with PowerShell
The Web API can be invoked using Windows PowerShell, however, since the standard Invoke-WebRequest CmdLet does not support self-signed certificate, you should use the CmdLet defined in the downloadable file Code-For-Invoke-Nxql.ps1. After saving this script, load it into your PowerShell environment. Make sure that your PowerShell execution policy is set to unrestricted.
To load the script, type in the following in the PowerShell console:
. ./Code-For-Invoke-Nxql.ps1
To retrieve the list of names of all the devices of any platform in CSV format, for example, execute the following command:
Invoke-Nxql -ServerName 192.168.2.3
  -UserName admin -UserPassword admin
  -Platform windows,mac_os
  -Query "(select (name) (from device))" > devices.csv
To get the full command line options, type in:
Invoke-Nxql -?Using the Web API V2 with Power BI Desktop
Microsoft Power BI is a suite of interactive visualization tools that deliver analytical insights throughout your organization. Thanks to the Web API, feed Power BI with Nexthink data and graph the digital experience of end users on visually appealing charts.
First ensure that the Windows device where you run Power BI Desktop trusts the server certificate of the Engine:
If you replaced the default certificate of the Engine with a server certificate signed by a publicly-trusted CA, nothing else needs to be done, as Windows will usually trust the certificate.
Otherwise, install the root certificate of the CA that signed the Engine certificate in the Trusted Root Certification Authorities store of your Windows device, as explained here for devices that run the Collector or the Finder.
To invoke the Web API V2 from Power BI Desktop:
Open Power BI Desktop.
Select Get Data from the top menu.
Choose Web as data source.
In the From web dialog, type in your Web API query as URL, requesting XML as output format.
Remember that you can easily get this URL while editing your query in the NXQL editor by copying the link from the Other formats section at the bottom of the page.
Click OK.
If the connection cannot be established because of a TLS error, verify that you imported the correct root certificate to trust the server certificate of the Engine.
Type in your Web API credentials when prompted to do so.
In the Navigator, select the body to get the XML data from the Engine response.
Click Load.
The data source is now added. However, Power BI is unable to send authentication credentials again when using these parameterized queries. The solution is to divide the query into a base and a relative path:
In Power BI Desktop, select Edit Queries from the top menu.
Open the data source that calls the Web API and select Advanced Editor.
In the editor, look for the Source variable under the let keyword:
Source=XML.Table(Web.Contents("https://our-engine-dns-name:1671/2/query? query=(select%20(id%20name)(from%20device))%20&format=xml" ...Divide the URL of the query into a base and a relative path as follows:
Source=XML.Table(Web.Contents("https://our-engine-dns-name:1671/2/", [ RelativePath="query?query=(select%20(id%20name)(from%20device))%20&format=xml" ]...
For each subsequent query, Power BI Desktop will use the credentials that you typed in when you first created the data source.
RELATED TASK
RELATED CONCEPT